OS X RVM
Step 1: Open Terminal
Step 2: Install A Compiler (XCode or GCC)
Go on to Install Xcode
Step 3: Install Homebrew
Type this in the terminal:ruby -e "$(curl -fsSL https://raw.githubusercontent.com/Homebrew/install/master/install)"Verify
Type this in the terminal:brew -vApproximate expected result:Homebrew 1.1.13-19-g55c02ae77 Homebrew/homebrew-core (git revision 4075; last commit 2017-04-18)The greyed-out text may differ and is not important.
Step 4: Install Git
Type this in the terminal:git --versionApproximate expected result:git version 2.x.xThe greyed-out text may differ and is not important.Otherwise, type this in the terminal:brew install gitVerify
Type this in the terminal:git --versionApproximate expected result:git version 2.x.xThe greyed-out text may differ and is not important.
Step 5: Install RVM, the Ruby Version Manager
Step 5.1: Install RVM
Type this in the terminal:curl -L get.rvm.io | bash -s stableStep 5.2: Configure your shell
Verify
Type this in the terminal:type rvm | head -1Expected result:rvm is a functionType this in the terminal:rvm -vApproximate expected result:rvm 1.x.x (stable) by Wayne E. Seguin (wayneeseguin@gmail.com), Michal Papis <mpapis@gmail.com> [https://rvm.io/]The greyed-out text may differ and is not important.
Step 6: Configure RVM to use Homebrew
Type this in the terminal:rvm autolibs homebrew
Step 7: Install Ruby
Type this in the terminal:rvm install 2.3.8Type this in the terminal:rvm use 2.3.8Type this in the terminal:rvm --default use 2.3.8Verify
Type this in the terminal:ruby -vApproximate expected result:ruby 2.3.8.0p0 (2014-12-25 revision 49005) [x86_64-darwin13]The greyed-out text may differ and is not important.Troubleshooting
Step 8: Install Rails
Type this in the terminal:gem install railsVerify
Type this in the terminal:rails -vApproximate expected result:Rails 5.0.xThe greyed-out text may differ and is not important.
Step 9: Install Atom
Step 9.1: Download Atom
Step 9.2: Find the downloaded file in Finder
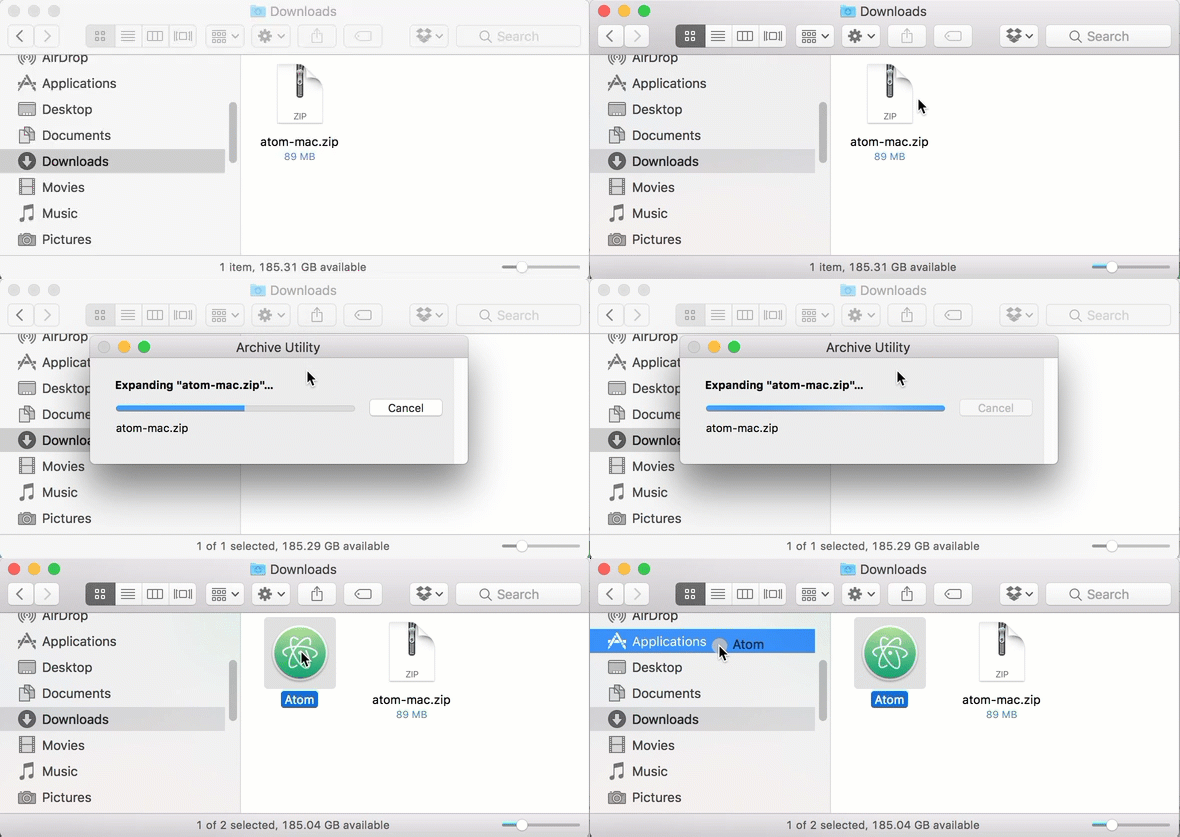
Step 9.3: Extract Atom and move it to your Applications folder.

Verify successful installation
Type this in the terminal:git --versionApproximate expected result:git version 2.x.xThe greyed-out text may differ and is not important.Type this in the terminal:which rubyApproximate expected result:/Users/alex/.rvm/rubies/ruby-2.0.0-p247/bin/rubyThe greyed-out text may differ and is not important.Type this in the terminal:which railsApproximate expected result:/Users/alex/.rvm/gems/ruby-2.0.0-p247/bin/railsThe greyed-out text may differ and is not important.
Next Step:
Go on to Configure Git